AutoCAD Course:
Table of Contents
- Introduction – Why This Guide Exists
- Understanding the Two Giants – AutoCAD & SketchUp
- Deep Dive: AutoCAD Course Syllabus (Full Breakdown)
- 3.1 Level 1 – Basic 2D Drafting
- 3.2 Level 2 – Intermediate 2D & Intro to 3D
- 3.3 Level 3 – Advanced 3D Modeling
- 3.4 Level 4 – Specializations & Industry Applications
- Deep Dive: SketchUp Course Syllabus (Full Breakdown)
- 4.1 Level 1 – Foundations of 3D Modeling
- 4.2 Level 2 – Organizing Complex Models
- 4.3 Level 3 – Materials, Lighting & Presentation
- 4.4 Level 4 – LayOut for Construction Documents
- 4.5 Level 5 – Photorealistic Rendering (V-Ray/Enscape)
- Side‑by‑Side Comparison – 30+ Parameters
- Which Course Is Right for You? (Detailed Personas)
- Career Outcomes & Job Roles After Each Course
- Certifications – Global Recognition & Exam Details
- Free & Paid Learning Resources (Curated List)
- Recommended 6‑Month & 12‑Month Learning Paths
- Frequently Asked Questions (25+ Expert Answers)
- Real Student Success Stories (Case Studies)
- Conclusion – Final Words from TrendSetter Institute
- Call‑to‑Action (CTA) – Enroll Today!
1. AutoCAD Course
Why This Guide Exists
Welcome to the most comprehensive guide written for students at TrendSetter Institute of Computer and Digital Skill, Talagang. If you are reading this, you are confused about whether to enroll in an AutoCAD course or a SketchUp course or perhaps both.
Let us be honest with you:
- AutoCAD is the backbone of engineering, architecture, and construction industries worldwide. It is a precision tool that has been the industry standard for over 40 years. Learning AutoCAD can open doors to stable, well‑paying jobs in civil engineering firms, architectural consultancies, manufacturing units, and government projects.
- SketchUp is the darling of creative professionals – interior designers, woodworkers, landscape architects, and set designers. It is intuitive, fast, and produces beautiful 3D visuals that clients love. SketchUp can turn your creative ideas into tangible models in minutes.
But here are the reality no single course fits everyone. Your choice should depend on your interests, career goals, budget, and learning style. This guide will help you make that decision with confidence.
2. Understanding the Two Giants
AutoCAD & SketchUp
Before diving into course details, let us tell you what makes each software unique.
AutoCAD – The Precision Powerhouse
| Aspect | Detail |
| Developer | Autodesk (USA) |
| First Release | 1982 |
| Primary File Format | .dwg |
| Core Philosophy | Absolute accuracy, repeatability, and industry‑standard documentation |
| Typical Users | Architects, civil engineers, mechanical engineers, electrical drafters, construction managers |
| Learning Curve | Very steep (150+ hours to become productive) |
| Cost (Commercial) | $1,975/year (full version) – but students get it free |
AutoCAD is not just a drawing tool. It is a platform that helps custom programming (AutoLISP, .NET), external references (Xrefs), sheet sets, dynamic blocks, and parametric constraints. When you learn AutoCAD, you are learning a language that engineers and contractors speak globally.
SketchUp – The Creative Visualizer
| Aspect | Detail |
| Developer | Trimble (USA) – formerly Google |
| First Release | 2000 |
| Primary File Format | .skp |
| Core Philosophy | Fast, intuitive, visual 3D modeling |
| Typical Users | Interior designers, woodworkers, landscape architects, real estate agents, set designers |
| Learning Curve | Gentle (basic model in 1 day) |
| Cost (Commercial) | $349/year (Pro version) – free web version available |
SketchUp’s signature Push/Pull tool changed the world of 3D modeling. You draw a flat shape, click, and drag – it becomes a 3D object. The 3D Warehouse gives you access to millions of free models. SketchUp is about exploring ideas, not about perfect documentation.
Now, let us examine what you will actually learn in each course.
3. Deep Dive: AutoCAD Course Syllabus (Full Breakdown)
At TrendSetter Institute, our AutoCAD course is divided into four progressive levels. Each level builds on the previous one, and you receive a certificate upon completion of each level. (Read for more about institute)
3.1 Level 1 – Basic 2D Drafting (40–60 hours)
Objective: Become comfortable with the AutoCAD interface, essential drawing and editing commands, and basic annotation.
| Module | Topics Covered |
| Interface & Setup | Application menu, ribbon, toolbars, command line, status bar, workspace switching, template selection (.dwt), units (decimal, architectural, engineering), drawing limits, grid, snap |
| Basic Drawing Commands | LINE (L), CIRCLE (C), ARC (A), POLYLINE (PL), RECTANGLE (REC), POLYGON (POL) – with examples and shortcuts |
| Coordinate Systems | Absolute coordinates (X,Y), relative coordinates (@dx,dy), polar coordinates (@distance<angle), direct distance entry |
| Editing Commands | MOVE (M), COPY (CO), ROTATE (RO), SCALE (SC), TRIM (TR), EXTEND (EX), OFFSET (O), MIRROR (MI), FILLET (F), CHAMFER (CHA) – each with real‑world exercises |
| Precision Tools | Object Snap (Osnap) – endpoint, midpoint, center, quadrant, intersection, perpendicular, tangent. Polar tracking, object snap tracking, dynamic input |
| Layer Management | Creating layers, assigning colors, lineweights (0.00mm to 2.11mm), linetypes (continuous, dashed, center, etc.), layer freeze/thaw, lock, plot/no plot |
| Annotation Basics | Single‑line text (TEXT), multi‑line text (MTEXT), text styles (font, height, width factor), spell check |
| Dimensions | Linear (DIMLINEAR), aligned (DIMALIGNED), angular (DIMANGULAR), radius/diameter (DIMRADIUS/DIMDIAMETER), dimension styles (DIMSTYLE) |
What you can build after Level 1:
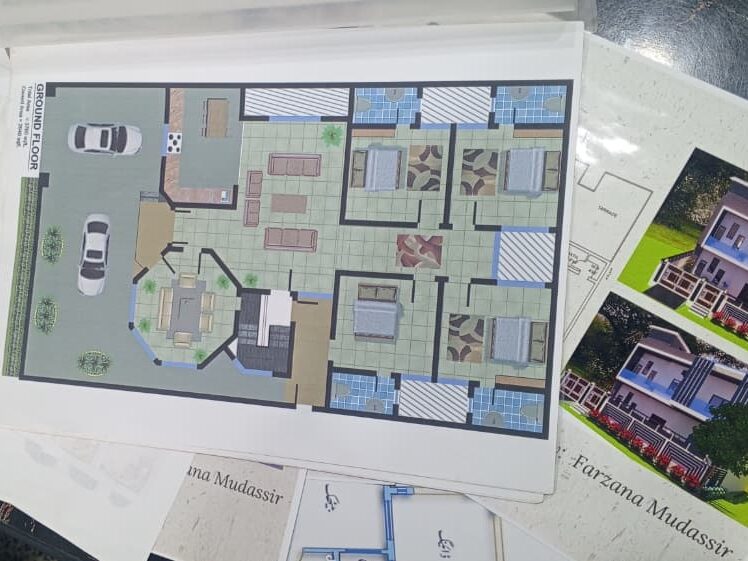
- A complete floor plan of a small house (2 bedrooms, 1 bathroom, kitchen, living area) with dimensions and text labels.
- Simple furniture layouts.
- Basic site plan with property lines.
Example exercise: Draw a 10m x 8m room with a 1m wide door and a 1.5m wide window. Add dimensions. Save as PDF.
3.2 Level 2 – Intermediate 2D & Introduction to 3D (40–60 hours)
Objective: Master arrays, blocks, attributes, parametric constraints, and basic 3D modeling.
| Module | Topics Covered |
| Advanced Editing | Rectangular array (ARRAYRECT), polar array (ARRAYPOLAR), path array (ARRAYPATH), mirror (MI), align (AL), explode (X), join (J) |
| Blocks & Attributes | Creating blocks (BLOCK), writing blocks to external files (WBLOCK), inserting blocks (INSERT), block editor (BEDIT), dynamic blocks (stretch, flip, rotation, array, lookup tables), attributes (ATTDEF), attribute extraction (DATAEXTRACTION) |
| Parametric Constraints | Geometric constraints (coincident, collinear, concentric, equal, fix, horizontal, vertical, parallel, perpendicular, tangent, smooth, symmetric), dimensional constraints (linear, aligned, radius, diameter, angular), constraint formulas (e.g., d1 = d2 * 1.5), parameters manager |
| Introduction to 3D | 3D coordinate systems (World UCS, User UCS), viewing 3D models (3DORBIT, VIEW, visual styles – 2D wireframe, 3D wireframe, 3D hidden, realistic, conceptual, shaded), extrusion (EXTRUDE), presspull (PRESSPULL), primitive solids (BOX, CYLINDER, SPHERE, CONE, WEDGE, TORUS) |
| Model Space vs Paper Space | Layout tabs, creating viewports (MVIEW), setting viewport scales (e.g., 1:100, 1:50), locking viewports, annotative scaling for text/dimensions/blocks |
| Plotting & Publishing | Page setups, plot styles (.ctb, .stb), printing to PDF (DWG to PDF.pc3), batch plotting (PUBLISH), exporting to image (JPEG, PNG) |
What you can build after Level 2:
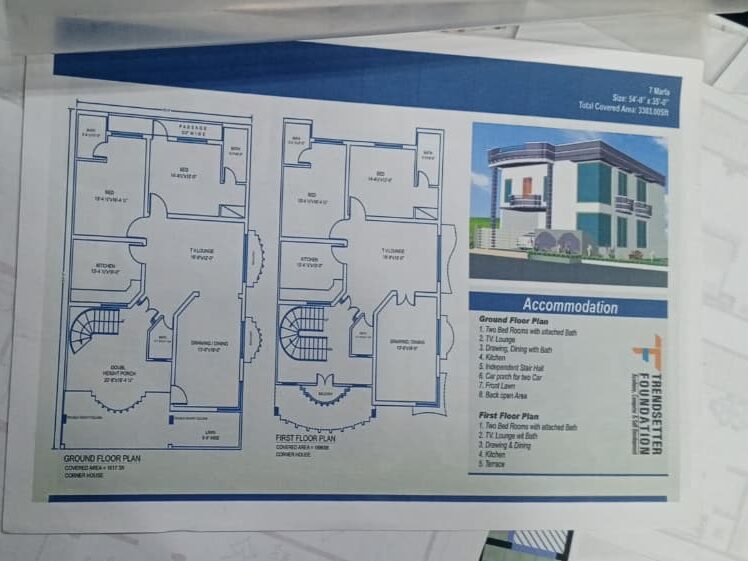
- A multi‑sheet drawing set for a small commercial building (floor plans, elevations, sections).
- Dynamic door/window blocks that resize with a grip.
- Simple 3D models of buildings (extruded from floor plans).
- A title block with automatic sheet numbering and date fields.
Example exercise: Create a dynamic block of a door that can change width from 700mm to 1200mm, change swing angle from 0 to 180 degrees, and show two visibility states (plan view vs elevation view).
3.3 Level 3 – Advanced 3D Modeling (50–70 hours)
Objective: Master solid modeling, surface modeling, rendering, and advanced 3D workflows.
| Module | Topics Covered |
| Advanced Solid Commands | Loft (LOFT) – blending multiple cross‑sections, Sweep (SWEEP) – extruding along a path, Revolve (REVOLVE) – rotating a profile around an axis, Helix (HELIX) – creating spiral paths, 3D Array (3DARRAY), Mirror 3D (MIRROR3D), 3D Align (3DALIGN) |
| Boolean Operations | UNION (combine solids), SUBTRACT (cut one solid from another), INTERSECT (keep only overlapping volume), INTERFERE (detect overlapping volumes) |
| Solid Editing | SOLIDEDIT (face extrusion, move, rotate, offset, delete), imprint, separate, shell (SOLIDEDIT → body → shell), fillet edges (FILLETEDGE), chamfer edges (CHAMFEREDGE) |
| Surface Modeling | NURBS surfaces, planar surfaces, network surfaces, patch surfaces, surface offset, surface blend – useful for organic shapes and automotive design |
| Mesh Modeling | Converting solids to meshes, smoothing meshes, crease edges, subdividing meshes |
| Rendering & Materials | Materials browser (MAT), material maps (color, reflection, roughness, bump), lighting (distant light, point light, spotlight, sunlight), environment (background, illumination), render presets (RENDER), rendering to image, animation (walkthrough) |
| Point Clouds & Importing | Importing LiDAR scans (.rcp, .rcs), attaching point clouds, working with large datasets (point cloud cropping, intensity coloring) |
What you can build after Level 3:
- A complete 3D model of a multi‑story building with detailed windows, doors, stairs, and furniture.
- Mechanical parts with precise tolerances (e.g., an engine bracket, a gearbox housing).
- Photorealistic renderings (with practice and external renderers like V‑Ray).
Example exercise: Model a spiral staircase using HELIX and SWEEP. Then add railings, render with glass and metal materials, and output a 360° panoramic image.
3.4 Level 4 – Specializations & Industry Applications (Optional, 30–50 hours each)
Specialization 1: Architectural Drafting
- Working with architectural templates, creating elevation and section views from 3D models (SECTIONPLANE, SECTIONPLANETOBLOCK), using annotation scaling for large projects, generating door/window schedules with Data Extraction, coordinating with structural and MEP xrefs.
Specialization 2: Civil Engineering Drafting
- Introduction to AutoCAD Civil 3D (surfaces, alignments, profiles, pipe networks), creating contour maps from survey data, road cross‑sections, quantity takeoffs.
Specialization 3: Mechanical Drafting
- Creating detailed part drawings with tolerances, surface finishes, and geometric dimensioning and tolerancing (GD&T) symbols, generating bill of materials (BOM), working with sheet metal (flat patterns).
Specialization 4: Electrical Drafting
- Schematic diagrams, panel layouts, wiring diagrams, using wire numbers and component tags.
TrendSetter Institute offers all four specializations. Contact us for schedules.
4. Deep Dive: SketchUp Course Syllabus (Full Breakdown)
Our AutoCAD course is designed to take you from an absolute beginner to a professional level. While many students compare a SketchUp path with an AutoCAD course, our training ensures you become a confident modeler who can produce client-ready presentations. By enrolling in this AutoCAD course, you will master everything from basic 2D drafting to complex construction documents. This specific AutoCAD course at TrendSetter Institute is the most comprehensive way to start your engineering or design career.
4.1 Level 1 – Foundations of 3D Modeling (15–25 hours)
Objective: Understand the SketchUp interface, navigation, and basic drawing tools.
| Module | Topics Covered |
| Interface & Navigation | Templates (meters, millimeters, feet/inches), toolbars (large tool set), axes (red=X, green=Y, blue=Z), orbit (O – or middle mouse button), pan (H), zoom (Z), zoom extents (Shift+Z), walk (W), look around (Shift+O) |
| Basic Drawing Tools | Line (L), Rectangle (R), Circle (C), Polygon, Arc (A) – 3‑point arc, pie arc, tangent arc |
| The Push/Pull Tool | The most important tool in SketchUp – select a face, click, drag to extrude. Double‑click to repeat last extrusion. Use Ctrl/Option to leave original face. |
| Selecting & Moving | Select tool (Space), selection methods (single click, double click to select linked, triple click to select all connected), move (M), copy with move + Ctrl/Option, rotate (Q), scale (S) – uniform vs non‑uniform |
| Grouping & Basic Components | Why groups are essential (to prevent geometry sticking together), creating groups (G), editing groups (double‑click), exploding groups, creating components (C), component vs group differences |
What you can build after Level 1:
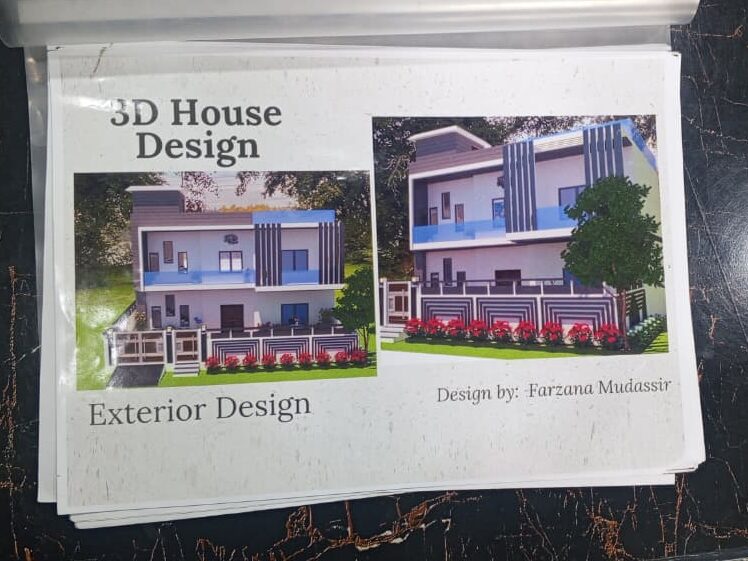
- A simple house: floor rectangle, push/pull walls, add a roof (follow me or manual).
- A basic chair: seat, legs, backrest.
- A garden shed with a sloped roof.
Hands-On Exercise: SketchUp vs. AutoCAD Course Methods
While the AutoCAD course focuses on high-precision 2D drafting, our SketchUp module allows for rapid 3D visualization. Try this exercise to see the difference:
- Create the Base: Draw a circle. In our AutoCAD course, you’d use the
CIRCLEcommand for exact radius drafting, but here, just click and drag. - Add Volume: Use the Push/Pull tool to lift the circle into a cylinder.
- The Handle (Follow Me): Draw a path for the handle and a small circle at the start. Use the Follow Me tool to extrude the circle along the path.
Why learn both? Students often ask if an AutoCAD course is enough. The truth is, mastering the AutoCAD course gives you the technical foundation, while SketchUp gives you the creative speed. At TrendSetter Institute, we ensure our AutoCAD course graduates also understand how to bridge their 2D plans into 3D models like this.
4.2 Level 2 – Organizing Complex Models (15–25 hours)
Objective: Use components, the 3D Warehouse, the Outliner, and more advanced modeling tools.
While the AutoCAD course at TrendSetter Institute focuses on mathematical precision and industry-standard documentation, this module explores the creative efficiency of SketchUp. In a professional AutoCAD course workflow, you often build everything from scratch for accuracy; however, in this part of our training, we show you how to speed up your design process using pre-made assets.
| Module | Topics Covered |
| 3D Warehouse | Accessing the warehouse, searching for models (furniture, trees, vehicles, people), downloading and inserting, adjusting scale, using components as placeholders |
| Outliner & Layers | Outliner (hierarchy of groups/components), creating layers (now called “tags” in newer versions), assigning tags, hiding/showing tags, tag folders |
| Advanced Modeling Tools | Offset (F) – create parallel edges, Follow Me (extrude along a path – e.g., picture frame, pipe, cornice), Scale tool (S) – proportional scaling, scaling along one axis (use Ctrl key), rotate tool, tape measure (T) – create guides, resize entire model |
| Solid Tools (Pro only) | Union, subtract, intersect, trim, split – for Boolean operations on solid groups |
| Sandbox Tools (Terrain Modeling) | From contours (import .dwg contours, select, use “From Contours”), from scratch (grid), smoove, stamp, add detail – for landscape design |
What you can build after Level 2:
- A fully furnished living room with imported furniture from 3D Warehouse.
- A terrain model with a house placed on it.
- A complex component like a cabinet with shelves and doors (using components for each drawer).
Hands-On Exercise: Merging SketchUp with your AutoCAD Course Skills
In a professional AutoCAD course workflow, you would typically draw the precise 2D floor plan of a garage. In this module, we use those AutoCAD course foundations to build a 3D environment quickly:
Final Placement: Place the car inside the garage to check for clearance—a practical application of the site planning skills covered in the AutoCAD course.
Source Assets: Download a car model from the 3D Warehouse.
Scale for Accuracy: Adjust the car’s scale to fit a standard garage. While an AutoCAD course teaches you to scale using specific factors for printing, here you will scale visually to match your 3D geometry.
Model the Structure: Build the garage around the car. Many students from our AutoCAD course find this “reverse modeling” helpful for understanding spatial design.
4.3 Level 3 – Materials, Lighting & Presentation (15–25 hours)
Objective: Apply realistic materials, control shadows, create scenes, and produce stunning presentations.
While the AutoCAD course ensures your technical drawings meet industry standards, this module focuses on making those designs look realistic. In a professional AutoCAD course workflow, you create the “blueprints,” but here you learn how to turn those blueprints into a visual story that clients can understand and admire..
| Module | Topics Covered |
| Materials | Materials panel, default libraries (brick, wood, metal, glass, stone), paint bucket (B), editing materials (color, texture, opacity, reflection), importing custom textures (your own photos), material position (rotate, move, scale) |
| Shadows & Geo‑location | Shadow settings (time of day, month, UTC offset), turning shadows on/off, using shadows for solar studies, geo‑locating your model (add real‑world location for accurate sun position) |
| Scenes | Creating scenes (saved camera views + style settings), scene tab management, scene properties (include which layers, shadows, style), scene transition (for animation), exporting scenes as images or video |
| Styles | Style builder, preset styles (sketchy edges, watercolor, hidden line, monochrome, shaded with textures), customizing edge styles (color, thickness, extension), face styles, background/fog |
| Section Planes | Adding section planes (Section Plane tool), moving and rotating section planes, creating section cuts, exporting section slices to LayOut |
What you can build after Level 3:
- A photorealistic interior scene (with textures, shadows, and multiple cameras/scenes).
- A walkthrough animation (transition between scenes, export as MP4).
- A solar study showing how sunlight moves through a building over a day.
Example Exercise: Interior Design & Presentation
While an AutoCAD course teaches you how to create the precise architectural floor plans and electrical layouts for a café, this exercise focuses on the visual experience. By combining your AutoCAD course foundations with SketchUp’s rendering power, you can create a professional-grade project:
Animation: Export a video flythrough. This is the ultimate way to show clients the practical reality of the 2D designs you mastered during your AutoCAD course training.
Setting the Scene: Start with the 2D layout you developed in your AutoCAD course. Import it to ensure your walls and counters are mathematically accurate.
Material Application: Apply realistic wood flooring, glass for windows, and specific paint colors. This brings the technical lines of an AutoCAD course to life.
Scene Creation: Set up 5 specific scenes (Entrance, Counter, Seating, Outdoor, and Bird’s-eye). This allows you to present the precise space planning learned in the AutoCAD course from every angle.
4.4 Level 4 – Layout for Construction Documents (SketchUp Pro only, 20–30 hours)
Objective: Convert your 3D SketchUp model into professional 2D drawings (plans, elevations, sections, details) using LayOut.
While the AutoCAD course is the industry gold standard for creating 2D construction documents from scratch, this module teaches you how to generate similar professional drawings directly from your 3D models. Many students find that the documentation skills they master in our AutoCAD course make learning LayOut much easier, as the principles of scales, layers, and annotations remain the same.
| Module | Topics Covered |
| LayOut Interface | Document setup (paper size, units), toolbars, pages, layers, geometry vs paper space |
| Viewports | Inserting SketchUp viewports, selecting scale (e.g., 1:50, 1:100), rendering styles (raster, vector, hybrid), updating viewports when model changes |
| Dimensions & Annotations | Linear dimensions, aligned dimensions, angular dimensions, text labels, callouts (clouds), dimension styles, precision settings |
| Title Blocks & Templates | Creating a title block (lines, text, logos), saving as template, inserting fields (sheet number, date, scale, file path) – some fields automatically update |
| Exporting | Export to PDF (multi‑page, vector quality), export to DWG/DXF (for AutoCAD users), printing, sharing via Trimble Connect |
What you can build after Level 4:
- A full set of construction drawings for a small house (floor plan, four elevations, two sections, foundation plan, roof plan).
- A presentation booklet for a client (cover page, 3D renderings, dimensioned plans, material board).
Example exercise: Model a garden shed. In LayOut, create a title block, add a plan view (scale 1:20), an elevation view (scale 1:20), and a 3D perspective view. Add dimensions and notes. Export as PDF.
4.5 Level 5 – Photorealistic Rendering (V-Ray for SketchUp, 15–25 hours)
Objective: Produce high‑quality, photorealistic images and animations using third‑party renderers.
The final stage of any professional project is rendering. While an AutoCAD course provides the essential “skeleton” and technical accuracy of a building, rendering software adds the “skin” and lighting. Students often ask if a standard AutoCAD course is enough for client presentations; the answer is that combining the precision of an AutoCAD course with advanced rendering creates a winning portfolio.
| Module | Topics Covered |
| V-Ray Basics | Installing V-Ray, asset editor, render button, progressive rendering vs bucket rendering |
| Materials | V-Ray material library, creating custom materials (diffuse, reflection, glossiness, refraction, bump/normal maps), applying to SketchUp groups/components |
| Lights | Rectangle light (window light), sphere light, IES lights (real‑world light profiles), dome light (HDRI environment), sunlight (from SketchUp sun) |
| Cameras | Physical camera (exposure, shutter speed, ISO, white balance), depth of field, auto focus |
| Rendering Settings | Quality presets (low, medium, high, very high), resolution, denoiser, render elements (beauty, reflection, shadow, alpha) |
| Animation | Rendering a sequence of scenes, creating a video walkthrough, post‑processing (in Photoshop) |
What you can build after Level 5:
- A photorealistic image of a living room that looks like a photograph.
- An exterior render of a house with realistic landscaping and sky.
- A short 10‑second animation flythrough.
Example exercise: Model a modern kitchen. Apply V‑Ray materials (marble countertop, stainless steel appliances, glass cabinets). Light with rectangle lights and HDRI. Render a high‑resolution still image (4K). Add a denoiser for a clean look.
5. Side‑by‑Side Comparison – 30+ Parameters
Below is a detailed comparison table covering 30+ aspects to help you choose between a SketchUp path and our professional AutoCAD course. Use this data to decide which training aligns best with your career goals at TrendSetter Institute.
| Parameter | AutoCAD Course | SketchUp Course |
| Primary output | 2D construction drawings, technical plans | 3D visualizations, client presentations |
| Learning curve (1–10) | 9 (very steep) | 3 (gentle) |
| Time to first small project | 2–4 weeks | 1–2 days |
| Time to professional confidence | 6–12 months | 2–4 months |
| Mathematical precision | Up to 8 decimal places | ~3 decimal places |
| 2D drafting tools | Extremely advanced | Basic (via LayOut) |
| 3D modeling ease | Moderate (complex commands) | Very easy (Push/Pull) |
| File formats supported | 20+ (DWG, DXF, PDF, DGN, IFC, STL, etc.) | 10+ (SKP, DWG export only in Pro, STL, OBJ) |
| Industry standard for | Engineering, architecture (documentation), manufacturing | Interior design, woodworking, early concept |
| Typical job titles | CAD Drafter, Civil/Mechanical Designer, CAD Technician | Interior Designer, 3D Visualizer, Woodworker |
| Freelance demand | High (globally) | Medium (local interior work) |
| Average starting salary (PKR) | 35,000 – 60,000 per month | 25,000 – 45,000 per month |
| Certification exam cost | 100–100–150 (Autodesk) | 80–80–150 (Trimble) |
| Course duration (intensive) | 3–4 months (full‑time) | 1–2 months |
| Course duration (part‑time) | 6–8 months | 3–4 months |
| Software cost for students | Free (Autodesk Educational) | Free (web version) or discounted Pro |
| Requires high‑end PC? | Yes (CAD workstation recommended) | No (runs on modest laptops) |
| Best for left‑brained (analytical) learners? | Yes | No |
| Best for right‑brained (creative) learners? | No | Yes |
| Can be self‑taught easily? | Moderate (many resources) | Very easy (official tutorials) |
| Availability of free models | Limited (some libraries) | Excellent (3D Warehouse) |
| Rendering capability natively | Basic (internal renderer) | None (requires plugin) |
| Animation | Very basic (walk/fly) | Yes (scenes transition) |
| Collaboration tools | Xrefs, Sheet Set Manager, Autodesk Docs | Trimble Connect (cloud) |
| Programming/automation | AutoLISP, .NET, VBA (very powerful) | Ruby (limited) |
| Mobile app | AutoCAD Mobile (basic) | SketchUp for iPad (excellent) |
| Typical classroom setup | Computer lab, projector, step‑by‑step exercises | Interactive, design‑focused, feedback sessions |
| Portfolio value for engineering jobs | High | Low |
| Portfolio value for interior design jobs | Medium | High |
| Investment for lifetime skill | Very high (remains relevant for decades) | Medium (evolves quicker) |
6. Which Course Is Right for You? (Detailed Personas)
We have created 8 detailed personas to help you self‑identify.
Persona 1: The Aspiring Civil Engineer (AutoCAD)
Background: You are studying civil engineering or have a diploma. You want to work on roads, bridges, buildings, or water supply schemes.
Why AutoCAD: Civil engineering drawings require exact coordinates, survey data, and compliance with government standards. AutoCAD Civil 3D is the industry standard. SketchUp cannot handle large terrain models or coordinate geometry.
Recommendation: Take the full AutoCAD course (Levels 1–3) and then specialize in Civil 3D.
Persona 2: The Interior Design Enthusiast (SketchUp)
Background: You love decorating spaces, choosing furniture and colors, and creating mood boards. You may have an art background.
Why SketchUp: You need to show clients realistic 3D views quickly. The 3D Warehouse has millions of furniture models. AutoCAD is too technical and slow for this workflow.
Recommendation: Take the SketchUp course (Levels 1–4) and add V‑Ray rendering.
Persona 3: The Architecture Student (Both)
Background: You are studying architecture. You need to produce both conceptual models and construction documents.
Why both: Use SketchUp for early design and client presentations. Use AutoCAD (or Revit) for permit sets and construction details. Most architecture firms expect proficiency in both.
Recommendation: Take SketchUp first (2 months), then AutoCAD (3 months). Then consider Revit.
Persona 4: The Hobbyist Woodworker (SketchUp)
Background: You build furniture at home or in a small workshop. You need to visualize joinery and calculate cut lists.
Why SketchUp: Free version is enough. You can model in millimeters, use components for repetitive parts, and export cut lists via plugins (CutList Bridge). AutoCAD is overkill.
Recommendation: Take the basic SketchUp course (Levels 1–2) and focus on woodworking extensions.
Persona 5: The Construction Project Manager (AutoCAD)
Background: You oversee building projects. You need to read and mark up .dwg files, measure quantities, and coordinate with architects.
Why AutoCAD: Contractors and sub‑contractors share AutoCAD files. You need to open, measure, add clouds, and print. AutoCAD LT is sufficient.
Recommendation: Take AutoCAD Level 1 and Level 2 (focus on layouts, xrefs, and plotting).
Persona 6: The Mechanical Designer (AutoCAD)
Background: You design machine parts, tools, or sheet metal products. Precision and tolerances are critical.
Why AutoCAD: Mechanical drafting requires section views, detail views, BOM tables, and GD&T symbols. SketchUp lacks these.
Recommendation: Take AutoCAD Levels 1–3, then specialise in Mechanical or Inventor.
Persona 7: The Real Estate Agent (SketchUp)
Background: You sell properties and want to stage them virtually or show renovation possibilities.
Why SketchUp: Fast, easy, and clients love 3D walkthroughs. No need for precise dimensions.
Recommendation: Take a short SketchUp course (Levels 1–2) and focus on importing furniture.
Persona 8: The Complete Beginner (Start with SketchUp, then AutoCAD)
Background: You have never used any design software. You are unsure if you will enjoy it.
Why start with SketchUp: It gives you quick wins and builds 3D thinking. After 2–3 months, you can decide if you want more precision.
Recommendation: Take SketchUp Level 1. If you enjoy it, continue. Then try AutoCAD Level 1. Many students end up loving both.

7. Career Outcomes & Job Roles After Each Course
Choosing to enroll in an AutoCAD course or a SketchUp program opens different professional doors. While SketchUp is excellent for visualization, the AutoCAD course is often the primary requirement for technical hiring in engineering and construction firms.
1. Top Job Roles for AutoCAD Course Graduates
Because an AutoCAD course focuses on precision and industry-standard documentation, graduates usually find high-paying roles in technical sectors:
- CAD Technician: Using skills from your AutoCAD course to create detailed 2D and 3D technical drawings.
- Architectural Drafter: Transforming sketches into precise blueprints based on AutoCAD course standards.
- Civil Engineering Assistant: Assisting in infrastructure projects using the technical tools mastered in an AutoCAD course.
- Mechanical Drafter: Designing machinery parts with the exact tolerances taught in a professional AutoCAD course.
- Project Coordinator: Managing site plans and technical layouts derived from an AutoCAD course workflow.
2. Top Job Roles for SketchUp Graduates
While the AutoCAD course handles the “math,” SketchUp handles the “beauty.” Graduates often work in:
- 3D Visualizer: Turning 2D plans from an AutoCAD course into stunning 3D models.
- Interior Designer: Focusing on furniture, lighting, and aesthetics.
- Event & Set Designer: Quickly modeling stages and exhibition booths.
- Landscape Architect: Creating 3D garden and park layouts.
3. Salary Expectations: AutoCAD Course vs. SketchUp
In the global and local market (including Talagang and larger hubs), having an AutoCAD course certification on your resume often leads to a more stable starting salary.
After AutoCAD Course (Full Levels 1–3)
| Job Role | Average Entry Salary (PKR) | Where You Can Work |
| CAD Drafter (Architecture) | 35,000 – 50,000 | Architectural firms, real estate developers |
| Civil CAD Technician | 40,000 – 60,000 | Government engineering departments, construction companies |
| Mechanical Drafter | 45,000 – 65,000 | Manufacturing units, automotive suppliers |
| Interior CAD Drafter | 30,000 – 45,000 | Interior design firms (if they require AutoCAD) |
| Freelance CAD Designer | 50,000 – 100,000+ (per project) | Upwork, Fiverr, local clients |
After SketchUp Course (Full Levels 1–4 + Rendering)
| Job Role | Average Entry Salary (PKR) | Where You Can Work |
| Interior Designer (Junior) | 25,000 – 40,000 | Interior design studios, furniture showrooms |
| 3D Visualizer | 30,000 – 50,000 | Architectural visualisation firms, marketing agencies |
| Woodworking Designer | 25,000 – 45,000 | Furniture workshops, custom carpentry |
| Set & Exhibition Designer | 30,000 – 55,000 | Event management companies, theatre groups |
| Freelance 3D Modeler | 40,000 – 80,000 (per project) | 3D Warehouse, Etsy, local clients |
After Both Courses (Combined)
Having both skills makes you a hybrid designer – you can handle concept to construction. You become eligible for higher‑level positions like:
- Design Manager (small firms) – 60,000 – 90,000 PKR
- Project Coordinator (construction) – 50,000 – 75,000 PKR
- Independent Design Consultant – 100,000+ PKR per project
8. Certifications – Global Recognition & Exam Details
Autodesk AutoCAD Certifications
| Certification | Exam Code | Questions | Duration | Passing Score | Cost (USD) | Validity |
| AutoCAD Certified User | ACU-001 | 30 | 50 min | 70% | ~$100 | Lifetime |
| AutoCAD Certified Professional | ACP-001 | 35 | 120 min | 75% | ~$150 | 3 years |
After completing the modules in our AutoCAD course, the next step for a professional is official certification. This validates that your AutoCAD course training meets international industry standards.
Exam Topics (Professional Level):
To pass the professional exam, you must master several advanced features covered in our AutoCAD course syllabus:
- Advanced Editing & Dynamic Blocks: Learned in the mid-level phase of the AutoCAD course.
- Attributes & External References (Xrefs): Essential for team-based projects in a professional AutoCAD course environment.
- Sheet Sets & Plotting: Managing large project sets, a key focus of our AutoCAD course final projects.
- Parametric Constraints: Adding mathematical intelligence to your AutoCAD course designs.
- 3D Modeling Basics: The bridge between 2D drafting and 3D visualization taught in the AutoCAD course.
- Collaboration Tools: Learning to work with others using the cloud features of the modern AutoCAD course.
Where to take the Exam:
You can take the official exam at Autodesk Authorized Testing Centers. As part of our service at TrendSetter Institute, we can guide you through the registration process after you finish your AutoCAD course training here in Talagang.
Benefits of Certification for Students:
Higher Salary: Certified AutoCAD course professionals often earn 20-30% more than non-certified drafters.
Global Recognition: An AutoCAD course certificate from a recognized center adds massive weight to your CV.
Local Advantage: Many top employers in Pakistan specifically look for AutoCAD course graduates who hold Autodesk certifications.
Trimble SketchUp Certifications
| Certification | Level | Format | Cost (USD) | Validity |
| SketchUp Certified User | Fundamentals | Online, proctored | ~$80 | Lifetime |
| SketchUp Pro Certified | Advanced | Online, proctored | ~$150 | Lifetime |
Exam topics (Pro): Solid tools, LayOut, dynamic components, advanced inference, extension usage.
Benefits: Valued in interior design and woodworking communities globally.
TrendSetter Institute provides exam preparation classes for both certifications. Ask about our certification bundles.
why choose TrendSetter Institute?
- Small class sizes (max 12 students).
- Industry‑experienced instructors.
- Free career counseling.
- Job placement assistance for top graduates.
- Affordable fees with easy installment plans.
10. Free & Paid Learning Resources (Curated List)
Even after your course, continue learning with these resources.
Free Resources for AutoCAD
| Resource | Type | Link / Access |
| Autodesk Education | Free software + tutorials | education.autodesk.com |
| CAD in Black (YouTube) | Video tutorials | Search on YouTube |
| SourceCAD | Articles & exercises | thesourcecad.com |
| CADTutor | Forums & tutorials | cadtutor.net |
| AutoCAD University (Autodesk) | Webinars | autodesk.com/autocad-university |
Free Resources for SketchUp
| Resource | Type | Link / Access |
| SketchUp Free (web) | Software | app.sketchup.com |
| SketchUp Campus | Official lessons | learn.sketchup.com |
| SketchUp Essentials (YouTube) | Video tutorials | YouTube |
| 3D Warehouse | Free models | 3dwarehouse.sketchup.com |
| SketchUpForums | Community help | forums.sketchup.com |
Paid Resources (Optional, high quality)
| Resource | Cost | Best for |
| LinkedIn Learning (AutoCAD & SketchUp) | Monthly subscription | Structured video courses |
| Udemy – “AutoCAD 2026 Complete Course” | ~$15 (on sale) | Beginner to advanced |
| Udemy – “SketchUp Pro 2025” | ~$15 | Comprehensive SketchUp |
| “Mastering AutoCAD” by George Omura (book) | ~$40 | Reference book |
| “SketchUp to LayOut” by Matt Donley (book) | ~$30 | Advanced documentation |
11. Recommended 6‑Month & 12‑Month Learning Paths
6‑Month Learning Path (For Students with Part‑Time Availability, ~10 hours/week)
| Month | Focus | Key Activities | Software |
| 1 | SketchUp basics | Navigation, Push/Pull, groups, simple models | SketchUp Free |
| 2 | SketchUp intermediate | Components, 3D Warehouse, materials, scenes | SketchUp Free/Pro |
| 3 | AutoCAD basics | Interface, essential commands (Line, Trim, Offset), layers | AutoCAD Student |
| 4 | AutoCAD intermediate | Blocks, dimensions, model/paper space, plotting | AutoCAD Student |
| 5 | Combined project | Model a small house in SketchUp → export to .dwg → produce plans in AutoCAD | Both |
| 6 | Portfolio & certification | Polish 2–3 projects, take Autodesk Certified User exam | Both |
12‑Month Learning Path (For Full‑Time Dedication, ~20 hours/week)
| Quarter | Focus | Deliverable |
| Q1 (Months 1–3) | SketchUp Pro + LayOut + V‑Ray | Complete interior design project (3D renders + construction booklet) |
| Q2 (Months 4–6) | AutoCAD Levels 1 & 2 | Complete set of architectural drawings for a small building (plans, elevations, sections) |
| Q3 (Months 7–9) | AutoCAD Level 3 + Specialization (Civil/Mechanical) | 3D model + 2D drawings of a mechanical part or civil site plan |
| Q4 (Months 10–12) | Portfolio development + Certification exams | Professional PDF portfolio, Autodesk Certified Professional (or User), job applications |
TrendSetter Institute provides structured batch schedules for both paths. Contact us for the current batch calendar.

12. Frequently Asked Questions
Q1. Which course is better for a complete beginner with no computer background?
SketchUp. It is visual and forgiving. After 3 months of SketchUp, you will have the confidence to tackle AutoCAD.
Q2. Can I learn both courses simultaneously?
Not recommended. You will confuse the workflows. Learn SketchUp first (2 months), then AutoCAD (3 months). The combo package spreads them over 5 months.
Q3. Is AutoCAD difficult to learn on my own?
Yes, but not impossible. Many self‑taught people exist, but a structured course (like at TrendSetter Institute) reduces frustration by 80% and saves months of trial and error.
Q4. Do I need a powerful laptop for these courses?
For AutoCAD: A mid‑range laptop with 8GB RAM, SSD, and a dedicated GPU (even an entry‑level one) is fine for learning. For SketchUp: Any recent laptop with integrated graphics works.
Q5. Will I get a certificate after completing the course?
Yes. TrendSetter Institute issues a verifiable certificate (with QR code). It is not the same as Autodesk certification, but it proves you have completed our rigorous training.
Q6. How much can I earn as a freelancer after taking both courses?
Freelance rates in Pakistan: 2D drafting – PKR 1,500–3,000 per hour; 3D modeling – PKR 2,000–5,000 per hour; full interior design project – PKR 30,000–100,000. With both skills, you can earn PKR 50,000–150,000 per month freelancing.
Q7. Which course has more job openings in Talagang/Chakwal region?
AutoCAD is more in demand for government construction projects and local engineering firms. SketchUp is popular among interior decorators and furniture makers. However, remote online work opportunities exist for both.
Q8. Can I use SketchUp for 3D printing?
Yes, but only the Pro version exports .stl. The free web version cannot. We teach .stl export in our Level 2.
Q9. Is there an age limit for these courses?
No. We have students from 15 to 55 years old. Basic computer literacy (using mouse, keyboard, saving files) is helpful but not mandatory.
Q10. What if I miss a class?
We provide recorded lectures and revision sessions. You can catch up during lab hours.
Q11. Do you offer job placement?
Yes. We maintain a list of local employers and also help students build a strong LinkedIn profile and portfolio for remote work.
Q12. Which software is used by the Pakistani government for public works?
AutoCAD (mostly Civil 3D). All public works departments (PWD, C&W, WAPDA) use .dwg files.
Q13. Can I switch from SketchUp to AutoCAD easily after learning?
The 3D thinking transfers, but the command‑line interface and precision mindset are new. Expect 2–4 weeks of adjustment.
Q14. Do I need to buy the software?
No. Students get free AutoCAD (1‑year license, renewable) from Autodesk. SketchUp Free is free. For SketchUp Pro, we provide a lab license.
Q15. How do I enroll at TrendSetter Institute?
Call, WhatsApp, or visit our campus. See the CTA section below.
Q16. What is the refund policy?
Fees are non‑refundable after the first week. However, you can transfer to a future batch if needed.
Q17. Are there female‑only batches?
Yes, upon request. We offer separate batches for female students with female instructors.
Q18. Can I attend the course online?
We currently offer on‑campus training for better hands‑on experience. Online options are being planned – ask for updates.
Q19. What language is used for teaching?
We teach primarily in Urdu/Hindi with English terminology. All handouts and resources are in English.
Q20. Will I learn both 2D and 3D in the AutoCAD course?
Yes. Our AutoCAD course covers 2D (Levels 1–2) and 3D (Level 3). The combo includes both.
Q21. How long does it take to become an expert in AutoCAD?
About 12–18 months of consistent practice (10+ hours/week). Our course gives you a strong foundation.
Q22. Does SketchUp have a mobile app?
Yes, SketchUp for iPad is excellent. We cover basic mobile workflows.
Q23. Can I do interior design with AutoCAD?
Yes, but it is slower and less visual. Many interior designers use both: AutoCAD for plans, SketchUp for 3D.
Q24. What is the difference between Layout in SketchUp and paper space in AutoCAD?
Both create scaled views, but Layout is more presentation‑oriented (magazine‑style layout) while AutoCAD paper space is more production‑oriented (batch plotting, sheet sets).
Q25. Which course should I take first if I want to become an architect?
AutoCAD first. In architectural education, technical drawing is foundational. Then learn SketchUp for concept design.
13. Real Student Success Stories (Case Studies)
Case Study 1: Ahsan from Talagang (AutoCAD Course)
Background: Ahsan had completed a diploma in civil engineering but could not find a job because he lacked practical CAD skills. He joined our AutoCAD course in 2024.
What he learned: 2D drafting, site plans, basic 3D, and plotting.
Outcome: Within 2 months of completing the course, he was hired as a CAD drafter at a local construction company at PKR 45,000 per month. He now works on government housing schemes.
Case Study 2: Fatima – Interior Designer (SketchUp + V-Ray)
Background: Fatima had a small home‑based interior decoration business. She used hand sketches, which clients found hard to understand.
What she learned: SketchUp modeling, materials, scenes, and V‑Ray rendering.
Outcome: She now shows clients photorealistic renders before starting any work. Her conversion rate increased by 70%. She earned back her course fee in two months.
Case Study 3: Bilal – Both Courses (Career Switch)
Background: Bilal was a retail salesman. He wanted to move into a technical field.
What he learned: 6‑month combo (SketchUp first, then AutoCAD).
Outcome: He now freelances as a 3D visualiser (SketchUp) and also takes AutoCAD drafting gigs. His monthly income went from PKR 25,000 to PKR 80,000–120,000.
14. Conclusion Final Words from TrendSetter Institute
After reading more than 5,000 words of detailed analysis, you should have a very clear idea of which course aligns with your ambitions.
To summarise:
- Choose AutoCAD if you are aiming for engineering, construction, or large‑scale architecture. It is the language of precision and technical documentation. The learning curve is steep, but the career rewards are substantial.
- Choose SketchUp if you are creative, want fast results, and plan to work in interior design, woodworking, landscape, or real estate. It is fun, intuitive, and visually stunning.
- Choose both if you want to be a complete designer – from concept to construction. This combination makes you a valuable asset for any design or construction firm.
At TrendSetter Institute of Computer and Digital Skill, Talagang, we are committed to your success. Our courses are not just about software buttons; they are about design thinking, industry workflows, and real‑world problem solving. We keep our class sizes small, our instructors are working professionals, and our lab is open for practice every day.
15. Call‑to‑Action (CTA) – Enroll Today!
Limited Seats Available for the 2026 Batch!
Get Certified. Get Hired. Start Your Journey Now.
How to Enroll:
- Visit Us:
TrendSetter Institute of Computer and Digital Skill
Alfalah Bank Street opt Jinnah Park, Talagang. - Call or WhatsApp:
📞 0301-5408600
📞 0300-5474939
Note: Seats fill quickly. We accept only 12 students per batch to maintain quality.
What You Get When You Join:
- ✅ Comprehensive printed notes and exercise files
- ✅ Lifetime access to recorded class videos
- ✅ Free practice lab (10 AM – 6 PM, weekdays)
- ✅ One free retake if you need more practice
- ✅ Job placement assistance (CV review, mock interviews, employer introductions)
- ✅ Certificate of completion (with QR verification)
- ✅ 24/7 WhatsApp support group for doubt solving
Still Have Questions?
Call us or drop by for a free trial class – no obligation. Talk to our instructors, see the lab, and then decide.
🎓 TrendSetter Institute of Computer and Digital Skill, Talagang
“Empowering Talagang’s Youth with Digital Skills for a Global Future”
📍 Address: Alfalah Bank Street, opt Jinnah Park, Talagang
📞 Phone/WhatsApp: 0301-5408600/ 0300-5474939
📘 Facebook: https://www.facebook.com/share/1LF81dRZka/
📸 Instagram: @TrendSetter Institute of computer and digital skill
Your future in design starts here. Don’t wait – claim your seat today!